Particle Explosion with Android
Ever wondered how explosions are created? Let’s take a little detour and try to implement a basic particle explosion.
An explosion is nothing more than a bunch of particles (be them pixels, small shapes or images) scattered across the screen, originating from a single point. Not all the time but mostly and for the sake of simplicity we’ll assume that all particles originate from a single point.
Just think of fireworks. A tiny little rocket shoots up and explodes into hundreds of sparkling little stars that fade out as they fall down. What happens is that a huge force in the center of the rocket rips the body apart (thus creating particles) and scatters them randomly around the point of explosion.
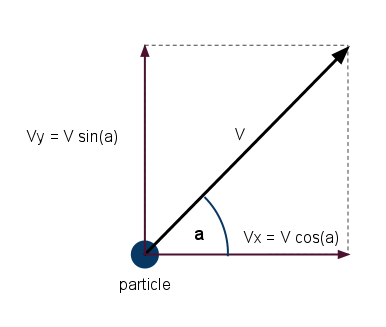
To make it simple we’ll create a few particles, we will place them in one place (the origin) and give them random forces. A force is a vector quantity. It means that it has magnitude and direction. The magnitude will determine its speed and its direction will tell the particle which way to go.
The Particle
Particle
The class file:
public class Particle {


    public static final int STATE_ALIVE = 0;    // particle is alive

    public static final int STATE_DEAD = 1;     // particle is dead


    public static final int DEFAULT_LIFETIME    = 200;  // play with this

    public static final int MAX_DIMENSION       = 5;    // the maximum width or height

    public static final int MAX_SPEED           = 10;   // maximum speed (per update)


    private int state;          // particle is alive or dead

    private float width;        // width of the particle

    private float height;       // height of the particle

    private float x, y;         // horizontal and vertical position

    private double xv, yv;      // vertical and horizontal velocity

    private int age;            // current age of the particle

    private int lifetime;       // particle dies when it reaches this value

    private int color;          // the color of the particle

    private Paint paint;        // internal use to avoid instantiation

}
The particle is nothing more than a little rectangle (this can be an image, circle or any other shape, but in our case we use a rectangle) with a few properties.
It has a state. This indicates whether the particle is alive or dead. A particle is alive when its color is not black (it hasn’t faded) and its age hasn’t reached its lifetime. More on this a bit later.
It has a position. Its position in a 2D coordinate system is represented by 2 points: x and y.
It also has a speed and a direction. As you recall speed is a vector so it has 2 components in 2D. In 3D it will also have the z component but we stay in 2D for now. To keep it simple now we add two properties for this. vx and vy.
The age of the particle is 0 in the beginning and is incremented at each update.
The lifetime is the maximum age a particle can reach before it dies.
The rest are color and paint. These are for drawing only.
If you recall the previous entries, the game update is nothing more than calling the update methods of every entities in the game and displaying them. The update method of the particle is pretty simple.
But first we need to create the particle:
public Particle(int x, int y) {

    this.x = x;

    this.y = y;

    this.state = Particle.STATE_ALIVE;

    this.widht = rndInt(1, MAX_DIMENSION);

    this.height = this.widht;

    this.lifetime = DEFAULT_LIFETIME;

    this.age = 0;

    this.xv = (rndDbl(0, MAX_SPEED * 2) - MAX_SPEED);

    this.yv = (rndDbl(0, MAX_SPEED * 2) - MAX_SPEED);

    // smoothing out the diagonal speed

    if (xv * xv + yv * yv > MAX_SPEED * MAX_SPEED) {

        xv *= 0.7;

        yv *= 0.7;

    }

    this.color = Color.argb(255, rndInt(0, 255), rndInt(0, 255), rndInt(0, 255));

    this.paint = new Paint(this.color);

}
Check the creation of a particle and it should be straight forward.
You will notice that a particle is created at position x,y.
The state is set to alive.
We want to randomise the size of the rectangles because an explosion creates particles in different sizes and shapes but we’ll just randomise the size and colour.
I have written a few helper methods that give me random numbers, for this check the complete source code.
Next the lifetime is set. Every particle will have the same lifetime.
The age is 0 of course as the particle has just been born.
Next is the interesting bit. It’s very amateurish. To set the speed I have used 2 random numbers for the 2 components of the speed vector (vx and vy). The smoothing is needed because if both components are near the maximum value then the resulting magnitude will be over the max speed. You could use simple trigonometric functions with a random degree instead of this.
The las thing to set is the color which again is randomised.
There you have it.
The update() method for the particle.
public void update() {

    if (this.state != STATE_DEAD) {

        this.x += this.xv;

        this.y += this.yv;


        // extract alpha

        int a = this.color >>> 24;

        a -= 2; // fade by 2

        if (a <= 0) { // if reached transparency kill the particle

            this.state = STATE_DEAD;

        } else {

            this.color = (this.color & 0x00ffffff) + (a << 24);       // set the new alpha

            this.paint.setAlpha(a);

            this.age++; // increase the age of the particle

        }

        if (this.age >= this.lifetime) { // reached the end if its life

            this.state = STATE_DEAD;

        }

    }

}
It’s pretty simple. Every update, the position is set according to the speed and the alpha component of the particle’s color is decremented. In other words the particle is being faded.
If the age exceeded the lifetime or the opacity is 0 (that means that it is completely transparent) the particle is declared dead.
If you wonder about the magic with colours, it is quite simple once you get the bitwise operators. Don’t worry, I’m rubbish as well, just make sure you know where to look. Here is a good explanation of colour components and how to use bitwise operators to manipulate them: http://lab.polygonal.de/2007/05/10/bitwise-gems-fast-integer-math/. It’s faster than using the objects but you can safely use the android methods too.
A note on colours
You can specify colours in Android as an int. If you’re familiar with rgb and argb that is great.
rgb is 24 bits color while argb is 32 bits. It also has the alpha component which is transparency/opacity.
Opacity values: 0 = transparent, 255 = completely opaque.
To represent an int in hex you just prefix it with 0x. A color in hex is simple: 0x00FF00 is green for example. The pattern is: 0xRRGGBB (Red, Green, Blue). Now to add the alpha you will add it to the beginning. 0xAARRGGBB.
Because it is in hex, the values are between 00 and FF. 0 being 0 and FF being 255 in decimal.
When you create a colour out of components like color(a, r, g, b) (for example: new Color(125, 255, 0, 0) creates a semi transparent red), you can simply create it with an integer expressed in hex like this: new Color(0x80FF0000);
This is how you would extract the components of an argb colour.
int color = 0xff336699;

int alpha = color >>> 24;

int red   = color >>> 16 & 0xFF;

int green = color >>>  8 & 0xFF;

int blue  = color & 0xFF;
The draw() method is simple again.
public void draw(Canvas canvas) {

    paint.setColor(this.color);

    canvas.drawRect(this.x, this.y, this.x + this.widht, this.y + this.height, paint);

}
At this stage try to create some particles in your game panel and see what happens.
The Explosion
The explosion is nothing more than hundreds of particles originating from one place, the origin.
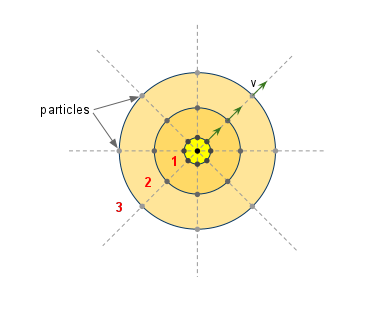
Explosion Diagram
In the image above you see the first 4 updates of a simple explosion. All the particles have the same speed but they spread out in different directions. Each circle is one update.
The main properties of an explosion are:
public class Explosion {


    public static final int STATE_ALIVE     = 0;    // at least 1 particle is alive

    public static final int STATE_DEAD      = 1;    // all particles are dead


    private Particle[] particles;           // particles in the explosion

    private int x, y;                       // the explosion's origin

    private int size;                       // number of particles

    private int state;                      // whether it's still active or not

}
It contains an array of particles. The size is the number of particles. An explosion is alive if it has at least one particle alive.
The update is extremely simple. It iterates through all the particles and calls the update() method on each particle. The draw() ditto.
In our application we will create explosions on the screen where we touch it.
The constructor is very simple:
public Explosion(int particleNr, int x, int y) {

    Log.d(TAG, "Explosion created at " + x + "," + y);

    this.state = STATE_ALIVE;

    this.particles = new Particle[particleNr];

    for (int i = 0; i < this.particles.length; i++) {

        Particle p = new Particle(x, y);

        this.particles[i] = p;

    }

    this.size = particleNr;

}
The array of particles is being filled at the touch down position.
In our application we will allow up to 10 explosions. So in the MainGamePanel we declare an array of explosions.
private Explosion[] explosions;
In the surfaceCreated method we instantiate the array and fill it with null.
explosions = new Explosion[10];

for (int i = 0; i < explosions.length; i++) {

    explosions[i] = null;

}
The onTouchEvent is where we create explosions.
public boolean onTouchEvent(MotionEvent event) {

    if (event.getAction() == MotionEvent.ACTION_DOWN) {

        // check if explosion is null or if it is still active

        int currentExplosion = 0;

        Explosion explosion = explosions[currentExplosion];

        while (explosion != null && explosion.isAlive() && currentExplosion < explosions.length) {

            currentExplosion++;

            explosion = explosions[currentExplosion];

        }

        if (explosion == null || explosion.isDead()) {

            explosion = new Explosion(EXPLOSION_SIZE, (int)event.getX(), (int)event.getY());

            explosions[currentExplosion] = explosion;

        }

    }

    return true;

}
What we do is iterate through the explosions and when we find the first null (this means we never used it for an instance) or the first dead explosion we create a new one at the touch position.
The update and render methods are straight forward. Iterate through the explosions and if they are not null and are alive then call their update and draw methods respectively.
In the final code I added a border for the screen as the wall and added a basic collision detection for the particles so they bounce off the walls. The wall is being transmitted as a reference and the update method checks for collision with it. Use it as an exercise and remove the collision and try attaching an image to the particle instead of being a rectangle. To create explosions just click on the screen.
It should look like this:
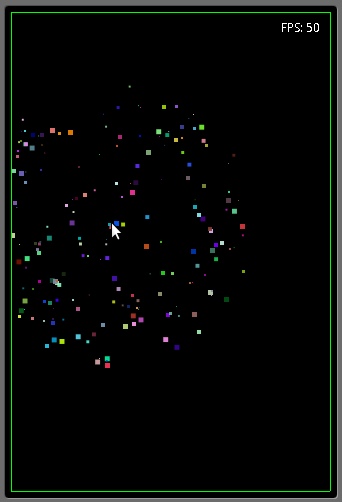
Explosion
Explore the code and have fun.
Download it here (TBD).