Create a 2D Platformer with libGDX - Part 1
In this article I will take a detour from the building blocks of a game engine and components and I will demonstrate how to prototype a game quickly using the libGDX library.
What you will learn:
-
Create a very simple 2D shooter platformer game.
-
What a complete game architecture looks like.
-
How to use 2D Graphics with OpenGL without knowing anything about OpenGL.
-
What different entities make up a game and how they are tied together in a game world.
-
How to add sound to your game.
-
How to build your game on the desktop and deploy in onto Android – yes, it’s that magic.
Steps to create a game
-
Have an idea for a game.
-
Draft up some scenarios on paper to resemble your vision and how will it look like.
-
Analyse the idea, iterate over a few versions by tweaking it and decide what the game will have in its initial version.
-
Pick a technology and start prototyping.
-
Start coding and creating the assets for the game.
-
Play-test, improve, and continuously make small steps towards finishing it.
-
Polish and release!
The Game Idea
Because this will be a one day project, there is very limited time at disposal and the goal is to learn the technology to make games, not the actual process. For this purpose I took the liberty to borrow ideas from other games and focus on the technical aspects of this process.
I will be borrowing heavily from a game called Star Guard. It’s a little gem made by Vacuum Flowers. Go get the game and check it out. A very simple shooter platformer with a simplistic style and old school arcade feel.
The idea is to guide our hero through the levels by killing enemies and and dodging everything that tries to kill us.
The controls are simple, the arrow keys move the hero to the left or right, Z jumps and X shoots the laser. The longer the jump button is held, the higher the hero jumps. He can change direction in the air and also shoot. We’ll see how we can translate these controls to Android later on.
The next steps (2 and 3) can be skipped over as we will already have this taken care of because of the functioning game.
Start your Eclipse
This is where we start. I will be using libGDX library to create the game. Why libGDX? It’s the best library (in my opinion) that makes developing games easy without knowing much about the underlying technology. It allows developers to create their games on the desktop and deploy it to Android without any modification. It offers all the elements to use it in games and hides the complexity of dealing with specific technologies and hardware. It will become more obvious as we go along.
Setting up the project
By following the instructions from libGDX’s documentation we have to first download the library.
Go to https://libgdx.badlogicgames.com/nightlies/ and download the libgdx-nightly-latest.zip file and unpack it.
Create a simple java project in eclipse. I will call it star-assault.
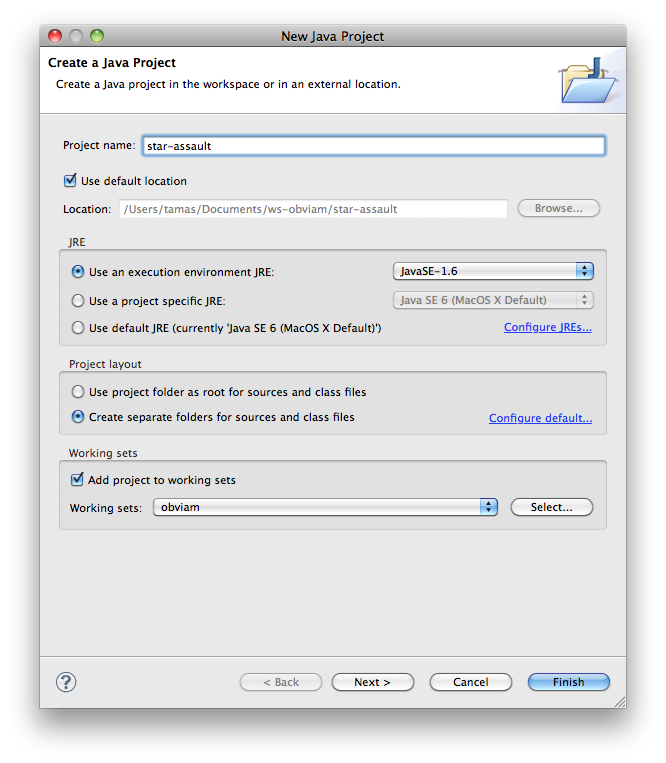
Project Setup
Leave the default settings and once the project was created, right click on it and select New->Folder and create a directory named libs.
From the unpacked libgdx-nighly-latest directory, copy the gdx.jar file into the newly created libs directory. Also copy the the gdx-sources.jar file into the libs directory. It is in the sources sub-directory of the unpacked gdx directory. You can do this by simply dragging the jar files into your directories in eclipse. If you copy them using explorer, or finder or any other means, don’t forget to refresh your eclipse project after by pressing F5.
The structure should look like the following image:
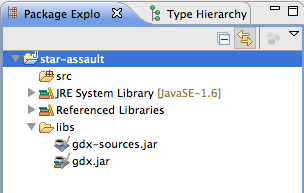
Project Structure
Add gdx.jar as a dependency to the project. Do this by right-clicking the project title and select Properties. On this screen pick Java Build Path and click onto the Libraries tab. Click Add JARs…, navigate to the libs directory and select gdx.jar, then click OK.
In order to have access to the gdx source code and to be able to debug our game easily, it’s a good idea to add the sources to the gdx.jar file. To do this, expand the gdx.jar node, select Source attachment, click Edit…, then Workspace… and pick gdx-sources.jar then OK until all the pop-up windows are closed.
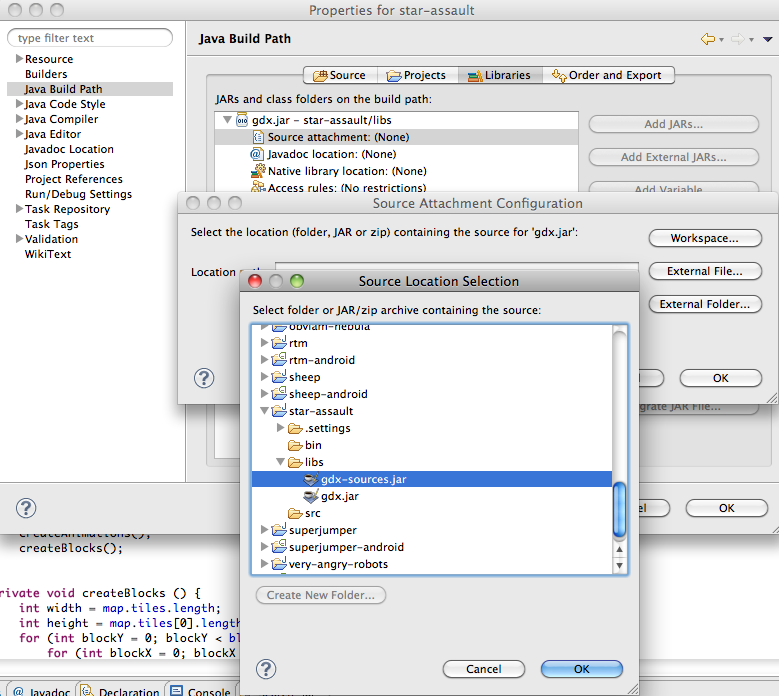
Project Setup
The complete documentation for setting up projects with libgdx can be found on the official wiki.
This project will be the core project for the game. It will contain the game mechanics, the engine, everything. We will need to create two more projects, basically launchers for the 2 platforms we are targeting. One for Android and one for Desktop. These projects will be extremely simple and will contain only the dependencies required to run the game on the respective platforms. Think of them as the class containing the main method.
Why do we need separate projects for these? Because libgdx hides the complexity of dealing with the underlying operating system (graphics, audio, user input, file i/o, etc.), Each platform has a specific implementation and we will need to include only those implementations (bindings) that are required targeted. Also because the application life-cycle, the asset loading (loading of images, sounds, etc) and other common aspects of an application are heavily simplified, the platform specific implementations reside in different JAR files and only those need to be included that are required for the platform we are targeting.
The Desktop Version
Create a simple java project as in the previous step and name it star-assault-desktop. Also follow the steps to create the libs directory. This time the required jar files from the downloaded zip file are:
gdx-natives.jar,
gdx-backend-lwjgl.jar,
gdx-backend-lwjgl-natives.jar.
Also add these jar files as dependencies to the project as in the previous project. (right click the project -> Properties -> Java Build Path -> Libraries -> Add JARs, select the three JARs and click OK.)
We also need to add the star-assault project to the dependencies. To do this, click the Projects tab, click Add, check the star-assault project and click OK.
Important! We need to make the star-assault project a transitive dependency, meaning that dependencies for this project to be made dependencies of projects depending on this. To do this: right click on the main project -> Properties -> Java Build Path -> Order and Export -> check the gdx.jar file and click OK.
The Android Version
For this you will need the Android SDK installed.
Create a new Android project in eclipse: File -> New -> Project -> Android Project.
Name it star-assault-android. For build target, check “Android 2.3?. Specify a package name net.obviam or your own preference. Next to “Create Activity” enter StarAssaultActivity. Click Finish.
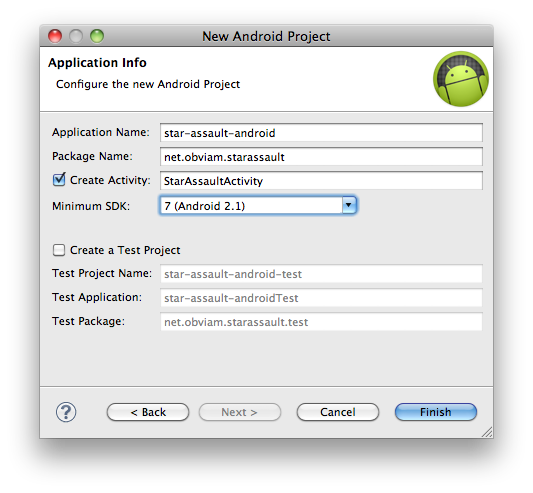
Project Setup
Go to the project directory and create a sub-directory named libs (you can do this from eclipse). From the nightly zip, place gdx-backend-android.jar and the armeabi and armeabi-v7a directories in the newly created libs directory.
In eclipse, right click the project -> Properties -> Java Build Path -> Libraries -> Add JARs, select gdx-backend-android.jar and click OK.
Click Add JARs again, select gdx.jar under the main project (star-assault) and click OK.
Click the Projects tab, click Add, check the main project and click OK twice.
This is how the structure should look like:

Project Setup
Important!
For ADT release 17 and newer, the gdx jar files need to be explicitly marked to be exported.
To do this
Click on the Android Project
Select Properties
Select Java Build Path (step 1)
Select Order and Export (step 2)
Check all the references, e.g. the gdx.jar, the gdx-backend-android.jar, the main project etc. (step 3).
The following image shows the new state.

ADT Fix
Also, more information on this issue here.
Sharing the Assets (images, sounds and other data)
Because the game will be identical on both desktop and Android but each version requires to be built separately from different projects, we want to keep the images, sounds and other data files in a shared location. Ideally this would be in the main project as it is included in both Android and desktop bu because Android has a strict rule on where to keep all these files, we will have to keep the assets there. It is in the automatically created assets directory in the Android project. In eclipse there is the possibility to link directories as in symbolic links on linux/mac or shortcuts in windows. To link the assets directory from the Android project to the desktop project do the following:
Right click the star-assault-desktop project -> Properties -> Java Build Path -> Source tab -> Link Source… -> Browse… -> browse to the assets directory in the star-assault-android project and click Finish. You can also extend the Variables… instead of browsing to the assets directory. It is recommended as it makes the project file system independent.
Also make sure the assets directory is included as a source folder. To do that, right click on the assets directory in eclipse (the desktop project), select Build Path -> Use as Source Folder.
At this stage we are ready with the setup and we can go ahead to work on the game.
Creating the Game
A computer application is a piece of software that runs on a machine. It starts up, does something (even if that’s nothing) and stops in a way or another. A computer game is a specific type of application in which the “does something” part is filled with a game. The start and end is common to all applications. Also the game has a very straight forward architecture based around an continuous loop. You can find out more about the architecture and the loop here and here.
Thanks to libGDX our game can be pieced together as a staged play in a theatre. All you need to do is, to think of the game as a theatrical play. We will define the stages, the actors, their roles and behaviours, but we will delegate the choreography to the player.
So to set up our game/play we need to take the following steps:
-
Start application.
-
Load up all the images and sounds and store them in memory.
-
Create the stages for our play along with the actors and their behaviours (rules for interactions between them).
-
Hand the control to the player.
-
Create the engine that will manipulate the actors on the stage based on the input received from the controller.
-
Determine when the play ends.
-
End the show.
It looks quite simple and it really is. I will be introducing the notions and elements as they appear.
To create the Game we simply need just one class.
Let’s create StarAssault.java in the star-assault project. Every class will be created in this project with 2 exceptions.
package net.obviam.starassault;


import com.badlogic.gdx.ApplicationListener;


public class StarAssault implements ApplicationListener {


 @Override

 public void create() {

  // TODO Auto-generated method stub

 }


 @Override

 public void resize(int width, int height) {

  // TODO Auto-generated method stub

 }


 @Override

 public void render() {

  // TODO Auto-generated method stub

 }


 @Override

 public void pause() {

  // TODO Auto-generated method stub

 }


 @Override

 public void resume() {

  // TODO Auto-generated method stub

 }


 @Override

 public void dispose() {

  // TODO Auto-generated method stub

 }

}
Just implement ApplicationListener from gdx and eclipse will generate the stubs for the methods needed to be implemented.
These are all the methods that we need to implement from the application lifecycle. It is very simple considering all the setup code needed for Android, or on desktop to initialise the OpenGL context and all those boring (and difficult) tasks.
The method create() is called first. This happens when the application is ready and we can start loading our assets and create the stage and actors. Think of building the stage for the play in a theatre AFTER all the things have been shipped there and prepared. Depending on where the theatre is and how you get there, the logistic can be a nightmare. You can ship things by hand, or by plane or trucks…we don’t know. We’re inside and have the stuff ready and we can start to assemble it. This is what libgdx is doing for us. Shipping our stuff and delivering it regardless of the platform.
The method resize(int width, int height) is called every time the drawable surface is resized. This gives us the chance to rearrange the bits before we go on to start the play. It happens when the window (if the game runs in one) is resized for example.
The heart of every game is the render() method which is nothing more than the infinite loop. This gets called continuously until we decide that the game is over and want to terminate the program. This is the play in progress.
Note: For computers the game over is not equivalent of program over. So it’s just a state. The program is in a state of game over, but is still running.
Of course that the play can be interrupted by pauses and they can be resumed. The pause() method will be called whenever the application enters into the background on the desktop or Android. When the application comes to the foreground it resumes and the resume() method is being called.
When the game is done and the application is being closed, the dispose() is called and this is the time to do some cleanup. It’s similar when the play is over, spectators have left and the stage is being dismantled. No more coming back. More on the lifecycle here.
The Actors
Let’s start taking steps towards the actual game. The first mile-stone is to have a world in which our guy can move. The world is composed of levels and each level is composed of a terrain. The terrain is nothing more than some blocks through which our guy can’t go.
Identifying the actors and entities so far in the game is easy.
We have the guy (let’s call him Bob – libGDX has tutorials with Bob) and the blocks that make up the world.
Having played Star Guard we can see that Bob has a few states. When we don’t touch anything, Bob is idle. He can also move (in both directions) and he can also jump. Also when he’s dead, he can’t do anything. Bob can be in only one of the 4 identified states at any given time. There are other states as well but we’ll leave them out for now.
The states for Bob:
-
Idle – when not moving or jumping and is alive
-
Moving – either left or right at a constant speed.
-
Jumping – also facing left or right and high or low.
-
Dead – he’s not even visible and respawning.
The Blocks are the other actors. For simplicity we have just blocks. The level consists of blocks placed in a 2 dimensional space. For simplicity we will use a grid.
Turn the start of Star Guard into a block and Bob structure, will look something like this:
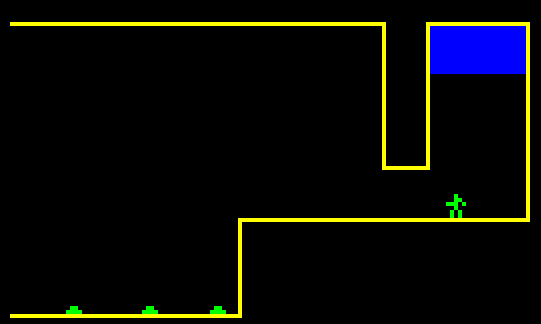
Star Guard Level 1
Star Assault Level 1
The top one is the original and the bottom one is our world representation.
We have imagined the world but we need to work in a measure system that we can make sense of. For simplicity we will say that one block in the world is one unit wide and 1 unit tall. We can use meters to make it even simpler but because Bob is half a unit, it makes him half a meter. Let’s say 4 units in the game world make up 1 meter so Bob will be 2 meters tall.
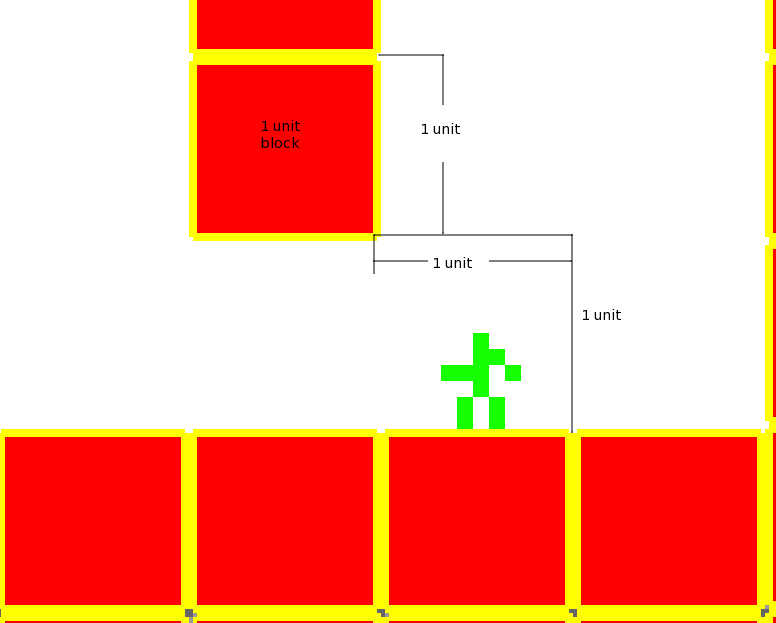
Unit System
It is important because when we will calculate the speed with which Bob runs for example, we need to know what we’re doing.
Let’s create the world.
Our main playable character is Bob.
The Bob.java class looks like this:
package net.obviam.starassault.model;


import com.badlogic.gdx.math.Rectangle;

import com.badlogic.gdx.math.Vector2;


public class Bob {


 public enum State {

  IDLE, WALKING, JUMPING, DYING

 }


 static final float SPEED = 2f; // unit per second

 static final float JUMP_VELOCITY = 1f;

 static final float SIZE = 0.5f; // half a unit


 Vector2  position = new Vector2();

 Vector2  acceleration = new Vector2();

 Vector2  velocity = new Vector2();

 Rectangle  bounds = new Rectangle();

 State  state = State.IDLE;

 boolean  facingLeft = true;


 public Bob(Vector2 position) {

  this.position = position;

  this.bounds.height = SIZE;

  this.bounds.width = SIZE;

 }

}
Lines #16-#21 define the attributes of Bob. The values of these attributes define Bob’s state at any given time.
position – Bob’s position in the world. This is expressed in world coordinates (more on this later).
acceleration – This will determine the acceleration when Bob jumps.
velocity – Will be calculated and used for moving Bob around.
bounds – Each element in the game will have a bounding box. This is nothing more than a rectangle, in order to know if Bob ran into a wall, got killed by a bullet or shot an enemy and hit. It will be used for collision detection. Think of playing with cubes.
state – the current state of Bob. When we issue the walk action, the state will be WALKING and based on this state, we know what to draw onto the screen.
facingLeft – represents Bob’s bearing. Being a simple 2D platformer, we have just 2 facings. Left and right.
Lines #12-#15 define some constants we will use to calculate the speed and positions in the world. These will be tweaked later on.
We also need some blocks to make up the world.
The Block.java class looks like this:
package net.obviam.starassault.model;


import com.badlogic.gdx.math.Rectangle;

import com.badlogic.gdx.math.Vector2;


public class Block {


 static final float SIZE = 1f;


 Vector2  position = new Vector2();

 Rectangle  bounds = new Rectangle();


 public Block(Vector2 pos) {

  this.position = pos;

  this.bounds.width = SIZE;

  this.bounds.height = SIZE;

 }

}
Blocks are nothing more than rectangles placed in the world. We will use these blocks to make up the terrain. We have one simple rule. Nothing can penetrate them.
libGDX note
You might have noticed that we are using the Vector2 type from libGDX. This makes our life considerably easier as it provides everything we need to work with Euclidean vectors. We will use vectors to position entities, to calculate speeds, and to move thing around.
The coordinate system and units
As the real world, our world has dimensions. Think of a room in a flat. It has a width, height and depth. We will make it 2 dimensional and will get rid of the depth. If the room is 5 meters wide and 3 meters tall we can say that we described the room in the metric system. It is easy to imagine placing a table 1 meter wide and 1 meter tall in the middle. We can’t go through the table, to cross it, we will need to jump on top of it, walk 1 meter and jump off. We can use multiple tables to create a pyramid and create some weird designs in the room.
In our star assault world, the world represents the room, the blocks the table and the unit, the meter in the real world.
If I run with 10km/h that translates to 2.77777778 metres / second (10 * 1000 / 3600). To translate this to Star Assault world coordinates, we will say that to resemble a 10km/h speed, we will use 2.7 units/second.
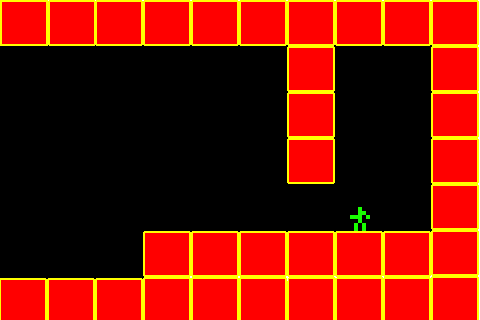
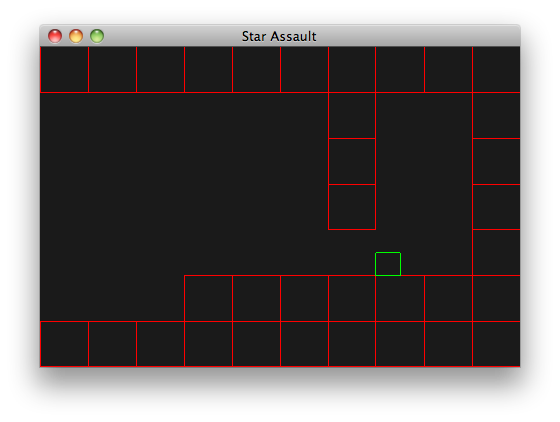
Examine the following diagram of representing the bounding boxes and Bob in the world coordinate system.

Coordinate System
The red squares are the bounding boxes of the blocks. The green square is Bob’s bounding box. The empty squares are just empty air. The grid is just for reference. This is the world we will be creating our simulations in. The coordinate system’s origin is at the bottom left, so walking left at 10.000 units/hour means that Bob’s position’s X coordinate will decrease with 2.7 units every second.
Also note that the access to the members is package default and the models are in a separate package. We will have to create accessor methods (getters and setters) to get access to them from the engine.
Creating the World
As a first step we will just create the world as a hard-coded tiny room. It will be 10 units wide and 7 units tall. We will place Bob and the blocks following the image shown below.
Level 1
The World.java looks like this:
package net.obviam.starassault.model;


import com.badlogic.gdx.math.Vector2;

import com.badlogic.gdx.utils.Array;


public class World {


 /** The blocks making up the world **/

 Array<Block> blocks = new Array<Block>();

 /** Our player controlled hero **/

 Bob bob;


 // Getters -----------

 public Array<Block> getBlocks() {

  return blocks;

 }

 public Bob getBob() {

  return bob;

 }

 // --------------------


 public World() {

  createDemoWorld();

 }


 private void createDemoWorld() {

  bob = new Bob(new Vector2(7, 2));


  for (int i = 0; i < 10; i++) {

   blocks.add(new Block(new Vector2(i, 0)));

   blocks.add(new Block(new Vector2(i, 7)));

   if (i > 2)

    blocks.add(new Block(new Vector2(i, 1)));

  }

  blocks.add(new Block(new Vector2(9, 2)));

  blocks.add(new Block(new Vector2(9, 3)));

  blocks.add(new Block(new Vector2(9, 4)));

  blocks.add(new Block(new Vector2(9, 5)));


  blocks.add(new Block(new Vector2(6, 3)));

  blocks.add(new Block(new Vector2(6, 4)));

  blocks.add(new Block(new Vector2(6, 5)));

 }

}
It is a simple container class for the entities in the world. Currently the entities are the blocks and Bob. In the constructor the blocks are added to the blocks array and Bob is created. It’s all hard-coded for the time being.
Remember that the origin is in the bottom left corner.
Creating the Game and Displaying the World
To render the world onto the screen, we need to create a screen for it and tell it to render the world. In libGDX there is a convenience class called Game and we will rewrite the StarAssault class a subclass of the Game class provided by libGDX.
About Screens
A game can consist of multiple screens. Even our game will have 3 basic screens. The Start Game screen, the Play Screen and the Game Over screen. Each screen is concerned with the things happening on it and they don’t care about each other. The Start Game screen for example will contain the menu options Play and Quit. It has two elements (buttons) and it is concerned about handling the clicks/touches on those elements. It renders tirelessly those two buttons and if the Play button is clicked/touched, it notifies the main Game to load the Play Screen and get rid of the current screen. The Play Screen will run our game and will handle everything regarding the game. Once the Game Over state is reached, it tells the main Game to transition to the Game Over screen, whose sole purpose is to display the high scores and listen to clicks on the Replay button.
Let’s refactor the code and create just the main screen for the game for the time being. We will skip the start and game over screens.
The GameScreen.java
package net.obviam.starassault.screens;


import com.badlogic.gdx.Screen;


public class GameScreen implements Screen {


 @Override

 public void render(float delta) {

  // TODO Auto-generated method stub

 }


 @Override

 public void resize(int width, int height) {

  // TODO Auto-generated method stub

 }


 @Override

 public void show() {

  // TODO Auto-generated method stub

 }


 @Override

 public void hide() {

  // TODO Auto-generated method stub

 }


 @Override

 public void pause() {

  // TODO Auto-generated method stub

 }


 @Override

 public void resume() {

  // TODO Auto-generated method stub

 }


 @Override

 public void dispose() {

  // TODO Auto-generated method stub

 }

}
The StarAssault.java will become very simple.
package net.obviam.starassault;


import net.obviam.starassault.screens.GameScreen;


import com.badlogic.gdx.Game;


public class StarAssault extends Game {


 @Override

 public void create() {

  setScreen(new GameScreen());

 }

}
GameScreen implements the Screen interface which is very much like an ApplicationListener but it has 2 important methods added.
show() – this is called when the main game makes this screen active
hide() – this is called when the main game makes another screen active
StarAssault has just one method implemented. The create() does nothing more than to activate the newly instantiated GameScreen. In other words, it creates it, calls the show() method and will subsequently call its render() method every cycle.
The GameScreen becomes our focus for the next part as it is where the game will live. Remember that the game loop is the render() method. But to have something to render we first need to create the world. The world can be created in the show() method as we don’t have any other screens that can interrupt our gameplay. Currently, the GameScreen is shown only when the game starts.
We will add two members to the class and implement the render(float delta) method.
private World world;

private WorldRenderer renderer;


/** Rest of methods ommited **/


@Override

public void render(float delta) {

 Gdx.gl.glClearColor(0.1f, 0.1f, 0.1f, 1);

 Gdx.gl.glClear(GL10.GL_COLOR_BUFFER_BIT);

 renderer.render();

}
The world attribute is the World instance which holds the blocks and Bob.
The renderer is a class which will draw/render the world onto the screen (I will reveal it shortly).
The render(float delta)
Let’s create the WorldRenderer class.
WorldRenderer.java
package net.obviam.starassault.view;


import net.obviam.starassault.model.Block;

import net.obviam.starassault.model.Bob;

import net.obviam.starassault.model.World;

import com.badlogic.gdx.graphics.GL10;

import com.badlogic.gdx.graphics.OrthographicCamera;

import com.badlogic.gdx.graphics.glutils.ShapeRenderer;

import com.badlogic.gdx.graphics.glutils.ShapeRenderer.ShapeType;

import com.badlogic.gdx.math.Rectangle;


public class WorldRenderer {


 private World world;

 private OrthographicCamera cam;


 /** for debug rendering **/

 ShapeRenderer debugRenderer = new ShapeRenderer();


 public WorldRenderer(World world) {

  this.world = world;

  this.cam = new OrthographicCamera(10, 7);

  this.cam.position.set(5, 3.5f, 0);

  this.cam.update();

 }


 public void render() {

  // render blocks

  debugRenderer.setProjectionMatrix(cam.combined);

  debugRenderer.begin(ShapeType.Rectangle);

  for (Block block : world.getBlocks()) {

   Rectangle rect = block.getBounds();

   float x1 = block.getPosition().x + rect.x;

   float y1 = block.getPosition().y + rect.y;

   debugRenderer.setColor(new Color(1, 0, 0, 1));

   debugRenderer.rect(x1, y1, rect.width, rect.height);

  }

  // render Bob

  Bob bob = world.getBob();

  Rectangle rect = bob.getBounds();

  float x1 = bob.getPosition().x + rect.x;

  float y1 = bob.getPosition().y + rect.y;

  debugRenderer.setColor(new Color(0, 1, 0, 1));

  debugRenderer.rect(x1, y1, rect.width, rect.height);

  debugRenderer.end();

 }

}
The WorldRenderer has only one purpose. To take the current state of the world and render its current state to the screen. It has a single public render() method which gets called by the main loop (GameScreen). The renderer needs to have access to the world so we will pass it in when we instantiate the renderer. For the first step, we will render the bounding boxes of the elements (blocks and Bob) to see what we have so far. Drawing primitives in OpenGL is quite tedious but libGDX comes with a ShapeRenderer which makes this task very easy.
The important lines are explained.
#14 – Declares the world as a member variable.
#15 – We declare an OrthographicCamera. We will use this camera to “look” at the world from an orthographic perspective. Currently the world is very small and it fits onto one screen, but when we will have an extensive level and Bob moves around in it, we will have to move the camera following Bob. It’s analogous to a real life camera. More on orthographic projections can be found here.
#18 – The ShapeRenderer is declared. We will use this to draw primitives (rectangles) for the entities. This is a helper renderer that can draw primitives like lines, rectangles, circles. For anyone familiar with canvas based graphics, this should be easy.
#20 – The constructor which takes the world as the parameter.
#22 – We create the camera with a viewport of 10 units wide and 7 units tall. This means that filling up the screen with unit blocks (width = height = 1) will result in showing 10 boxes on the X axis and 7 on the Y.
Important: This is resolution independent. If the screen resolution is 480×320, that means that 480 pixels represent 10 units, so a box will be 48 pixels wide. It also means that 320 pixels represent 7 units so the boxes on the screen will be 45.7 pixels tall. It won’t be a perfect square. This is due to the aspect ratio. The aspect ratio in our case is 10:7.
#23 – This lines positions the camera to look at the middle of the room. By default it looks at (0,0) which is the corner of the room. The camera’s (0,0) is in the middle as you would expect from a normal camera. The following image shows the world and camera set-up coordinates.
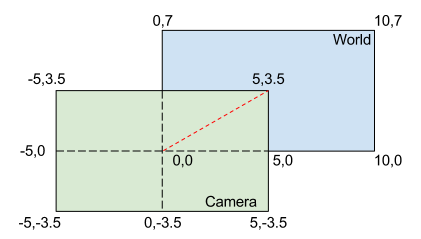
Camera Displacement
#24 – The internal matrices of the camera are updated. The update method must be called every time the camera is acted upon (move, zoom, rotate, etc). OpenGL hidden beautifully.
The render() method:
#29 – We apply the matrix from the camera to the renderer. This is necessary as we positioned the camera and we want them to be the same.
#30 – We tell the renderer that we want to draw rectangles.
#31 – We will draw the blocks so we iterate through all of them in the world.
#32 – #34 – Extract the coordinates of the each block’s bounding rectangle. OpenGL works with vertices (points) so for it to draw a rectangle have to know the coordinates for the starting point and the width. Notice that we work in camera coordinates which coincides with the world coordinates.
#35 – Set the color of the rectangles to red.
#36 – Draw the rectangle at the x1, y1 with the given width and height.
#39 – #44 – We do the same with Bob, but this time the rectangle is green.
#45 – We let the renderer know that we’re done drawing rectangles.
We need to add the renderer and the world to the GameScreen (main loop) and see it in action.
Modify the GameScreen like this:
package net.obviam.starassault.screens;


import net.obviam.starassault.model.World;

import net.obviam.starassault.view.WorldRenderer;


import com.badlogic.gdx.Gdx;

import com.badlogic.gdx.Screen;

import com.badlogic.gdx.graphics.GL10;


public class GameScreen implements Screen {


 private World world;

 private WorldRenderer renderer;


 @Override

 public void show() {

  world = new World();

  renderer = new WorldRenderer(world);

 }


 @Override

 public void render(float delta) {

  Gdx.gl.glClearColor(0.1f, 0.1f, 0.1f, 1);

  Gdx.gl.glClear(GL10.GL_COLOR_BUFFER_BIT);

  renderer.render();

 }


 /** ... rest of method stubs omitted ... **/


}
The render(float delta) method has 3 lines. The first 2 lines clear the screen with black and the 3rd line simply calls the renderer’s render() method.
The World and WorldRenderer are created when the screen is shown.
To test it on both the desktop and Android, we have to create the launchers for both platforms.
Creating the Desktop and Android Launchers
We have created 2 more projects in the beginning.
star-assault-desktop and star-assault-android, the latter being an Android project.
For the desktop project is dead simple. We need to create a class with a main method in it which instantiates an application provided by libGDX.
Create the StarAssaultDesktop.java class in the desktop project.
package net.obviam.starassault;


import com.badlogic.gdx.backends.lwjgl.LwjglApplication;


public class StarAssaultDesktop {

 public static void main(String[] args) {

  new LwjglApplication(new StarAssault(), "Star Assault", 480, 320, true);

 }

}
This is it. Line #7 is where everything happens. It instantiates a new LwjglApplication application passing in a new StarAssault instance which is a Game implementation. The 2nd and 3rd parameters tell the window’s dimension. I opted for 480×320 because it is a resolution supported on many Android phones and I want to resemble it on the desktop. The last parameter tells libGDX to use OpenGL ES 2.
Running the application as a normal Java program should produce the following result:
App Running
If you are getting some errors, track back and make sure the set-up is correct and all the steps are followed, including checking gdx.jar at the export tab on the star-guard Project properties -> Build Path.
The Android Version
In the star-assault-android project there is a single java class called StarAssaultActivity.
Change it to:
StarAssaultActivity.java
package net.obviam.starassault;


import android.os.Bundle;


import com.badlogic.gdx.backends.android.AndroidApplication;

import com.badlogic.gdx.backends.android.AndroidApplicationConfiguration;


public class StarAssaultActivity extends AndroidApplication {

    /** Called when the activity is first created. */

    @Override

    public void onCreate(Bundle savedInstanceState) {

        super.onCreate(savedInstanceState);

  AndroidApplicationConfiguration config = new AndroidApplicationConfiguration();

  config.useAccelerometer = false;

  config.useCompass = false;

  config.useWakelock = true;

  config.useGL20 = true;

  initialize(new StarAssault(), config);

    }

}
Pay attention that the new activity extends AndroidApplication.
In line #13 an AndroidApplicationConfiguration object is created. We can set all types of configurations regarding the Android platform. They are self explanatory but note that if we want to use the Wakelock, the AndroidManifest.xml file also needs to be modified. This asks permission from Android to keep the device on and to prevent dimming the screen if we don’t touch it.
Add the following line to the AndroidManifest.xml file somewhere inside the
<uses-permission android:name="android.permission.WAKE_LOCK"/>
Also in line #17 we tell Android to use OpenGL ES 2. This means we will be able to test it only on a device as the emulator does not support OpenGL ES 2. In case there is a problem with it, switch this to false.
Line #18 initialises the Android application and launches it.
Having a device connected to eclipse, it gets directly deployed and below you can see a photo of the application running on a nexus one. It looks identical to the desktop version.

App Running on a Nexus 1
The MVC Pattern
It’s quite impressive how far we came in such a short time. Note the use of the MVC pattern. It’s very efficient and simple. The models are the entities we want to display. The view is the renderer. The view draws the models onto the screen. Now we need to interact with the entities (especially Bob) and we will introduce some controllers too.
To read more on the MVC pattern, check out my other article or search for it on the net. It’s very useful.
Adding Images
So far it’s all nice but definitely we want to use some proper graphics. The power of MVC comes in handy and we will modify the renderer so it will draw images instead of rectangles.
In OpenGL to display an image is quite a complicated process. First it needs to be loaded, turned into a texture and then mapped to a surface which is described by some geometry. libGDX makes this extremely easy. To turn an image from the disk into a texture is a one liner.
We will use 2 images hence 2 textures. One texture for Bob and one for the blocks. I have created two images, a block and Bob. Bob is a copycat of the Star Guard chap. These are simple png files and I will copy them into the assets/images directory. I have two images: block.png and bob_01.png. Eventually Bob will become an animated character so I suffixed it with a number (panning for the future).
First let’s clean up the WorldRenderer a bit, namely, to extract the drawing of rectangles into a separate method as we will be using it for debug purposes.
We will need to load the textures and render them accordingly to the screen.
Take a look at the new WorldRenderer.java
package net.obviam.starassault.view;


import net.obviam.starassault.model.Block;

import net.obviam.starassault.model.Bob;

import net.obviam.starassault.model.World;

import com.badlogic.gdx.Gdx;

import com.badlogic.gdx.graphics.Color;

import com.badlogic.gdx.graphics.OrthographicCamera;

import com.badlogic.gdx.graphics.Texture;

import com.badlogic.gdx.graphics.g2d.SpriteBatch;

import com.badlogic.gdx.graphics.glutils.ShapeRenderer;

import com.badlogic.gdx.graphics.glutils.ShapeRenderer.ShapeType;

import com.badlogic.gdx.math.Rectangle;


public class WorldRenderer {


 private static final float CAMERA_WIDTH = 10f;

 private static final float CAMERA_HEIGHT = 7f;


 private World world;

 private OrthographicCamera cam;


 /** for debug rendering **/

 ShapeRenderer debugRenderer = new ShapeRenderer();


 /** Textures **/

 private Texture bobTexture;

 private Texture blockTexture;


 private SpriteBatch spriteBatch;

 private boolean debug = false;

 private int width;

 private int height;

 private float ppuX; // pixels per unit on the X axis

 private float ppuY; // pixels per unit on the Y axis

 public void setSize (int w, int h) {

  this.width = w;

  this.height = h;

  ppuX = (float)width / CAMERA_WIDTH;

  ppuY = (float)height / CAMERA_HEIGHT;

 }


 public WorldRenderer(World world, boolean debug) {

  this.world = world;

  this.cam = new OrthographicCamera(CAMERA_WIDTH, CAMERA_HEIGHT);

  this.cam.position.set(CAMERA_WIDTH / 2f, CAMERA_HEIGHT / 2f, 0);

  this.cam.update();

  this.debug = debug;

  spriteBatch = new SpriteBatch();

  loadTextures();

 }


 private void loadTextures() {

  bobTexture = new  Texture(Gdx.files.internal("images/bob_01.png"));

  blockTexture = new Texture(Gdx.files.internal("images/block.png"));

 }


 public void render() {

  spriteBatch.begin();

   drawBlocks();

   drawBob();

  spriteBatch.end();

  if (debug)

   drawDebug();

 }


 private void drawBlocks() {

  for (Block block : world.getBlocks()) {

   spriteBatch.draw(blockTexture, block.getPosition().x * ppuX, block.getPosition().y * ppuY, Block.SIZE * ppuX, Block.SIZE * ppuY);

  }

 }


 private void drawBob() {

  Bob bob = world.getBob();

  spriteBatch.draw(bobTexture, bob.getPosition().x * ppuX, bob.getPosition().y * ppuY, Bob.SIZE * ppuX, Bob.SIZE * ppuY);

 }


 private void drawDebug() {

  // render blocks

  debugRenderer.setProjectionMatrix(cam.combined);

  debugRenderer.begin(ShapeType.Rectangle);

  for (Block block : world.getBlocks()) {

   Rectangle rect = block.getBounds();

   float x1 = block.getPosition().x + rect.x;

   float y1 = block.getPosition().y + rect.y;

   debugRenderer.setColor(new Color(1, 0, 0, 1));

   debugRenderer.rect(x1, y1, rect.width, rect.height);

  }

  // render Bob

  Bob bob = world.getBob();

  Rectangle rect = bob.getBounds();

  float x1 = bob.getPosition().x + rect.x;

  float y1 = bob.getPosition().y + rect.y;

  debugRenderer.setColor(new Color(0, 1, 0, 1));

  debugRenderer.rect(x1, y1, rect.width, rect.height);

  debugRenderer.end();

 }

}
I’ll point out the important lines:
#17 & #18 – Declared constants for the viewport’s dimensions. It’s used for the camera.
#27 & #28 – Declare the 2 textures that will be used for Bob and the blocks.
#30 – The SpriteBatch is declared. The SpriteBatch takes care of all the texture mapping, displaying and so on for us.
#31 – It’s an attribute set in the constructor to know if we need to render the debug screen too or not. Remember, the debug rendering will just render the boxes for the game elements.
#32 – #35 – these variables are necessary to correctly display the elements. The width and height hold the screen size in pixels and are passed in from the operating system at the resize step. The ppuX and ppuY are the number of pixels per unit.
Because we set the camera to have a view port of 10×7 in world coordinates (meaning we can display 10 boxes horizontally and 7 boxes vertically) and we are dealing with pixels on the end result, we need to map those values to the actual pixel coordinates. We have chosen to work in a 480×320 resolution. That means that 480 pixels horizontally are equivalent of 10 units, meaning a unit will consists of 48 pixels on the screen.
If we try to use the same unit for the height (48 pixels) we get 336 pixels (48 * 7 = 336). But we have only 320 pixels available and we want to show the whole 7 blocks height. Doing the same for the vertical part, we get that 1 unit vertically will be 320 / 7 = 45.71 pixels. We need to distort every image a bit to fit in our world.
It’s perfectly fine and OpenGL does that very easily. This happens when we change the aspect ratio on our TV set and sometimes the image gets elongated or squashed to fit everything on the screen, or we just simply choose the option to cut the image off but maintain the aspect ratio.
Note: we use float for this, even if the screen resolution deals with ints, OpenGL prefers floats and so do we. OpenGL will work out the dimensions and where to place pixels.
#36 – The setSize(int w, int h) method will be called every time the screen is resized and it simply (re)calculates the units in pixels.
#43 – The constructor changed just a little but it does very important things. It instantiates the SpriteBatch and loads the textures (line #50).
#53 – loadTextures() does what it says: loads the textures. Look how incredibly simple it is. To create a texture, we need to pass in a file handler and it creates a texture out of it. The file handlers in libGDX are very helpful, as we don’t differentiate between Android or desktop, we just specify that we want to use an internal file and it knows how to load it. Note that for the path we skipped assets because assets is used as a source directory, meaning everything from that directory gets copied into the root of the final bundle. So assets acts as a root directory.
#58 – the new render() method contains just a few lines.
#59 & #62 – enclose a SpriteBatch drawing block/session. Every time we want to render images in OpenGL through the SpriteBatch we have to call begin(), draw our stuff and end() when we’re done. It is important to do that, otherwise it won’t work. You can read more on SpriteBatch here.
#60 & #61 – simply call 2 methods to render first the blocks and then Bob.
#63 & #64 – if debug is enabled, call the method to render the boxes. The drawDebug method was detailed previously.
#67 – #76 – the drawBlocks and drawBob methods are similar. Each method calls the draw method of the spriteBatch with a texture. It is important to understand this.
The first parameter is the texture (the image loaded from the disk).
The second and third parameters tell the spriteBatch where to display the image. Note that we use the conversion of coordinates from world coordinates to screen coordinates. Here is where the ppuX and ppuY are used. You can do the calculations by hand and see where the images get displayed. SpriteBatch by default uses a coordinate system with the origin (0, 0) in the bottom left corner.
That’s it. Just make sure you modify the GameScreen class so the resize gets called on the renderer and also to set the renderer’s debug to true.
The modified bits of GameScreen
/** ... omitted ... **/

 public void show() {

  world = new World();

  renderer = new WorldRenderer(world, true);

 }


 public void resize(int width, int height) {

  renderer.setSize(width, height);

 }

/** ... omitted ... **/
Running the application should produce the following result:
without debug
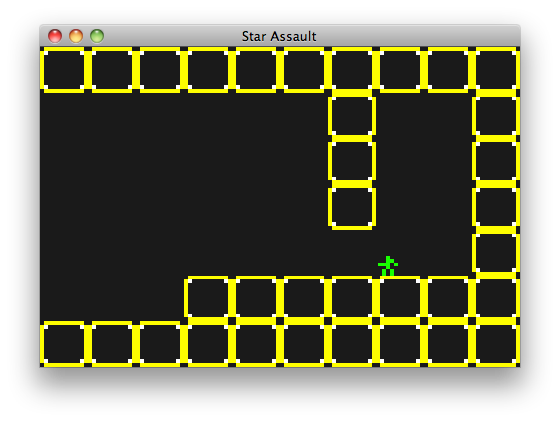
Without Debug
and with debug rendering
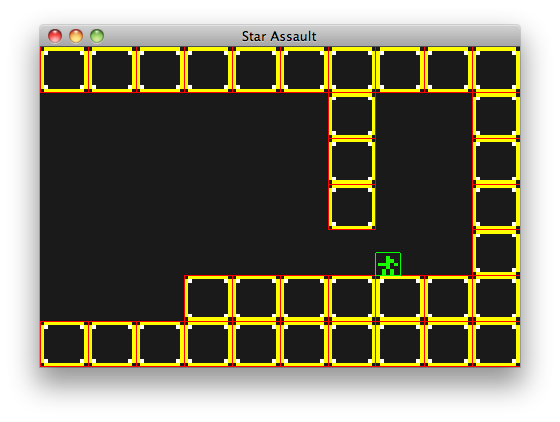
With Debug
Great! Give it a try on Android too and see how it looks.
Processing Input – on Desktop & Android
We’ve come a long way but so far the world is static and nothing interesting is going on. To make it a game, we need to add input processing, to intercept keys and touches and create some action based on those.
The control schema on the Desktop is very simple. The arrow keys will move Bob to the left and right, z will make Bob jump and x will fire the weapon. On Android we will have a different approach. We will designate some buttons for these functions and will lay it down on the screen and by touching the respective areas we will consider one of the keys pressed.
To follow the MVC pattern, we’ll separate the class that controls Bob and the rest of the world from the model and view classes. Create the package net.obviam.starassault.controller and all controllers will go there.
For the start we will control Bob by key presses. To play the game we to track the status of 4 keys: move left, move right, jump and fire. Because we will use 2 types of input (keyboard and touch-screen), the actual events need to be fed into a processor that can trigger the actions.
Each action is triggered by an event.
The move left action is triggered by the event when the left arrow key is pressed or a certain area of the screen is touched.
The jump action is triggered when the z key is pressed and so on.
Let’s create a very simple controller called WorldController.
package net.obviam.starassault.controller;


import java.util.HashMap;

import java.util.Map;

import net.obviam.starassault.model.Bob;

import net.obviam.starassault.model.Bob.State;

import net.obviam.starassault.model.World;


public class WorldController {


 enum Keys {

  LEFT, RIGHT, JUMP, FIRE

 }


 private World  world;

 private Bob  bob;


 static Map<Keys, Boolean> keys = new HashMap<WorldController.Keys, Boolean>();

 static {

  keys.put(Keys.LEFT, false);

  keys.put(Keys.RIGHT, false);

  keys.put(Keys.JUMP, false);

  keys.put(Keys.FIRE, false);

 };


 public WorldController(World world) {

  this.world = world;

  this.bob = world.getBob();

 }


 // ** Key presses and touches **************** //


 public void leftPressed() {

  keys.get(keys.put(Keys.LEFT, true));

 }


 public void rightPressed() {

  keys.get(keys.put(Keys.RIGHT, true));

 }


 public void jumpPressed() {

  keys.get(keys.put(Keys.JUMP, true));

 }


 public void firePressed() {

  keys.get(keys.put(Keys.FIRE, false));

 }


 public void leftReleased() {

  keys.get(keys.put(Keys.LEFT, false));

 }


 public void rightReleased() {

  keys.get(keys.put(Keys.RIGHT, false));

 }


 public void jumpReleased() {

  keys.get(keys.put(Keys.JUMP, false));

 }


 public void fireReleased() {

  keys.get(keys.put(Keys.FIRE, false));

 }


 /** The main update method **/

 public void update(float delta) {

  processInput();

  bob.update(delta);

 }


 /** Change Bob's state and parameters based on input controls **/

 private void processInput() {

  if (keys.get(Keys.LEFT)) {

   // left is pressed

   bob.setFacingLeft(true);

   bob.setState(State.WALKING);

   bob.getVelocity().x = -Bob.SPEED;

  }

  if (keys.get(Keys.RIGHT)) {

   // left is pressed

   bob.setFacingLeft(false);

   bob.setState(State.WALKING);

   bob.getVelocity().x = Bob.SPEED;

  }

  // need to check if both or none direction are pressed, then Bob is idle

  if ((keys.get(Keys.LEFT) && keys.get(Keys.RIGHT)) ||

    (!keys.get(Keys.LEFT) && !(keys.get(Keys.RIGHT)))) {

   bob.setState(State.IDLE);

   // acceleration is 0 on the x

   bob.getAcceleration().x = 0;

   // horizontal speed is 0

   bob.getVelocity().x = 0;

  }

 }

}
#11 – #13 – define an enum for the actions Bob will perform. Each keypress/touch can trigger one action.
#15 – declare the World that is in the game. We will be controlling the entities found in the world.
#16 – declare Bob as a private member and it is just a reference to Bob in the game world, but we will need it as it’s easier to refer to it than retrieving it every time we need him.
#18 – #24 – it’s a static HashMap of the keys and their statuses. If the key is pressed, it’s true, false otherwise. It is statically initialised. This map will be used in the controller’s update method to work out what to do with Bob.
#26 – This is the constructor that takes the World as the parameter and gets the reference to Bob as well.
#33 – #63 – These methods are simple callbacks that are called whenever an action button was pressed or a touch on a designated area happened. These methods are the ones that get called from whatever input we’re using. They simply set the the value of the respective pressed keys in the map. As you can see, the controller is a state machine too and its state is given by the keys map.
#66 – #69 – the update method which gets called every cycle of the main loop. currently it does 2 things: 1 – processes the input and 2 – updates Bob. Bob has a dedicated update method which we will see later.
#72 – #92 – the processInput method polls the keys map for the keys and sets the values on Bob accordingly. For example lines #73 – #78 check if the key is pressed for the movement to the left and if so, then sets the facing for Bob to the left, his state to State.WALKING and his velocity to Bob’s speed but with a negative sign. The sign is because on the screen, left the negative direction (origin is in the bottom left and points to the right).
The same thing for the right. There are some extra checks if both keys are pressed or none and in this case, Bob becomes State.IDLE and his horizontal velocity will be 0.
Let’s see what changed in Bob.java.
public static final float SPEED = 4f; // unit per second


public void setState(State newState) {

 this.state = newState;

}


public void update(float delta) {

 position.add(velocity.tmp().mul(delta));

}
Just changed the SPEED constant to 4 units (blocks) per second.
Also added the setState method because I forgot it before.
The most interesting is the newly acquired update(float delta) method, which is called from the WorldController. This method simply updates Bob’s position based on his velocity. For simplicity we do only that without checking his state and because the controller takes care to set the velocity for Bob according to his facing and state. We use vector math here and libgdx helps a lot.
We simply add the distance travelled in delta seconds to Bob’s current position. We use velocity.tmp() because the tmp() creates a new object with the same value as velocity and we multiply that object’s value with the elapsed time delta. In Java we have to be careful on how we’re using references as velocity and position are both Vector2 objects. More on vectors here.
We have almost everything, we just need to call the correct events when they happen. libGDX has an input processor which has a few callback methods. Because we are using the GameScreen as the playing surface, it makes sense to use it as the input handler too. To do this, the GameScreen will implement the libGDX InputProcessor.
The new GameScreen.java
package net.obviam.starassault.screens;


import net.obviam.starassault.controller.WorldController;

import net.obviam.starassault.model.World;

import net.obviam.starassault.view.WorldRenderer;


import com.badlogic.gdx.Gdx;

import com.badlogic.gdx.Input.Keys;

import com.badlogic.gdx.InputProcessor;

import com.badlogic.gdx.Screen;

import com.badlogic.gdx.graphics.GL10;


public class GameScreen implements Screen, InputProcessor {


 private World    world;

 private WorldRenderer  renderer;

 private WorldController controller;


 private int width, height;


 @Override

 public void show() {

  world = new World();

  renderer = new WorldRenderer(world, false);

  controller = new WorldController(world);

  Gdx.input.setInputProcessor(this);

 }


 @Override

 public void render(float delta) {

  Gdx.gl.glClearColor(0.1f, 0.1f, 0.1f, 1);

  Gdx.gl.glClear(GL10.GL_COLOR_BUFFER_BIT);


  controller.update(delta);

  renderer.render();

 }


 @Override

 public void resize(int width, int height) {

  renderer.setSize(width, height);

  this.width = width;

  this.height = height;

 }


 @Override

 public void hide() {

  Gdx.input.setInputProcessor(null);

 }


 @Override

 public void pause() {

  // TODO Auto-generated method stub

 }


 @Override

 public void resume() {

  // TODO Auto-generated method stub

 }


 @Override

 public void dispose() {

  Gdx.input.setInputProcessor(null);

 }


 // * InputProcessor methods ***************************//


 @Override

 public boolean keyDown(int keycode) {

  if (keycode == Keys.LEFT)

   controller.leftPressed();

  if (keycode == Keys.RIGHT)

   controller.rightPressed();

  if (keycode == Keys.Z)

   controller.jumpPressed();

  if (keycode == Keys.X)

   controller.firePressed();

  return true;

 }


 @Override

 public boolean keyUp(int keycode) {

  if (keycode == Keys.LEFT)

   controller.leftReleased();

  if (keycode == Keys.RIGHT)

   controller.rightReleased();

  if (keycode == Keys.Z)

   controller.jumpReleased();

  if (keycode == Keys.X)

   controller.fireReleased();

  return true;

 }


 @Override

 public boolean keyTyped(char character) {

  // TODO Auto-generated method stub

  return false;

 }


 @Override

 public boolean touchDown(int x, int y, int pointer, int button) {

  if (x < width / 2 && y > height / 2) {

   controller.leftPressed();

  }

  if (x > width / 2 && y > height / 2) {

   controller.rightPressed();

  }

  return true;

 }


 @Override

 public boolean touchUp(int x, int y, int pointer, int button) {

  if (x < width / 2 && y > height / 2) {

   controller.leftReleased();

  }

  if (x > width / 2 && y > height / 2) {

   controller.rightReleased();

  }

  return true;

 }


 @Override

 public boolean touchDragged(int x, int y, int pointer) {

  // TODO Auto-generated method stub

  return false;

 }


 @Override

 public boolean touchMoved(int x, int y) {

  // TODO Auto-generated method stub

  return false;

 }


 @Override

 public boolean scrolled(int amount) {

  // TODO Auto-generated method stub

  return false;

 }

}
The changes:
#13 – the class implements the InputProcessor
#19 – the width and height of the screen used by the Android touch events.
#25 – instantiate the WorldController with the world.
#26 – set the this screen as the current input processor for the the application. libGDX treats this as a global input processor so each screen has to set a different one if they don’t share the same. In this case the screen itself handles the input.
#47 & #62 – we set the active global input processor to null just for cleanup.
#68 – the method keyDown(int keycode) is triggered whenever a key is pressed on the physical keyboard. The parameter keycode is the value of the pressed key and this way we can poll it and in case it’s a desired key, do something. This is exactly what’s happening. Based on the keys we want, we pass on the event to the controller. The method also returns true to let the input processor know that the input was handled.
#81 – the keyUp is the exact inverse of the keyDown method. When the key is released, it simply delegates to the WorldController.
#111 – #118 – this is where it gets interesting. This happens only on touch-screens and the coordinates are passed in along with the pointer and button. The pointer is for multi-touch and represents the id of the touch it captures.
The controls are utterly simple and are made just for simple demo purposes. The screen is divided into 4 and if the touch falls int to lower left quadrant, it is treated as a move left action trigger and passes the same event as the desktop to the controller.
Exactly the same thing for the touchUp.
Warning: – This is very buggy and unreliable, as the touchDragged is not implemented and whenever the finger is dragged across quadrants it will mess up things. This will be fixed of course, the purpose is to demonstrate the multiple hardware inputs and how to tie them together.
Running the application on both desktop and Android will demonstrate the controls. On desktop the arrow keys and on Android by touching the lower corners of the screen will move Bob.
On desktop you will notice that using the mouse to simulate touches will also work. This is because touchXXX also handles mouse input on desktop. To fix this add the following line to the beginning of touchDown and touchUp methods:
if (!Gdx.app.getType().equals(ApplicationType.Android))

 return false;
This returns false if the application is not Android and does not execute the rest of the method. Remember that false means that the input was not handled.

Moving Around
As we can see, Bob has moved.
Short Recap
So far we have covered quite a bit of game development and we already have something to show.
Gradually we have introduced working pieces into our app and step by step we have achieved something.
We still need to add:
-
Terrain interaction (block collision, jump)
-
Animation
-
A big level and camera to follow Bob
-
Enemies and a gun to blast them
-
Sounds
-
Refined controls and fine tuning
-
More screens for game over and start
-
Have more fun with libGDX
Make sure you check out Part 2 (which is still in progress) in order to tick the aforementioned list. But go ahead and do it yourself by all means and any feedback is much appreciated.
Also check out libGDX and its awesome community. The source code for this project can be found here.